A homeowner signs your proposal on a Monday. By Friday, you’ve ordered shingles, booked a dumpster, and promised a crew a start date. The deposit you collected covers part of that, but not all of it. The rest comes out of your pocket until the next payment shows up.
That’s the moment a good roofing invoice template earns its keep. Bill each payment on a roofing job with its own invoice (deposit, progress, final), and make each one show three things the customer can follow: the full contract price, what they’ve already paid, and what’s still due. The free workbook below does that math for you.
This page is a free download with a guide attached. You get an Excel workbook (roofing-invoice-template.xlsx) with a setup tab, a ready-to-print invoice, and three completed examples that show one $15,000 job billed in three steps. The rest of the article explains how to fill it out, what each invoice should say, and how the payments line up with your costs. All names and numbers in the examples are made up to show the arithmetic.
| Invoice | Send it when | What it has to show | Example from a $15,000 sample job | Common mistake |
|---|---|---|---|---|
| Deposit | The customer signs the contract | Contract total, deposit amount, what the deposit is for, balance after payment | $4,500 due (30%). Balance after paying: $10,500 | Using the deposit for things other than this job’s costs |
| Progress | A milestone in your contract is hit, like materials delivered or tear-off started | Contract total, payments already received, this amount, balance after payment | $6,000 due (40%). $4,500 already paid. Balance after paying: $4,500 | Billing before the milestone really happened |
| Final | Work is done and the walkthrough is complete | Everything paid so far, any approved change orders, final amount, due date | $4,500 due (30%). $10,500 already paid. Balance after paying: $0 | Forgetting an approved change order or a deposit already paid |
Not every roofer takes a deposit, and some well-run roofing companies don’t take one at all. Maybe your best customers pay on completion, or you only bill at milestones. The workbook handles that. Leave the Deposit row off and bill two payments, or bill one final payment for the whole contract. The running balance works the same way. The cost of skipping the deposit is cash timing, and the cash-timing section below shows how big that gap can get.
What a roofing invoice needs to show
An invoice has one job: make it obvious what the customer owes and why. Roofing invoices get confusing when they skip the history. A homeowner who sees only “Amount due: $6,000” starts asking questions. A homeowner who sees the contract price, the deposit already paid, and the new balance usually doesn’t.
At a minimum, every invoice should have your company name and contact info, the customer’s name and the job address, an invoice number and date, a due date, and a clear description of what the payment covers. Add the contract total, the amount already paid, the amount due now, and the balance after this payment. Add how the customer can pay. If your state requires a license number on contracts or invoices, put it there too.
Two other things matter more than people expect. First, tie each invoice to your contract. If the contract says the second payment is due when materials are delivered, write that on the invoice, so nobody has to remember what was agreed. Second, keep a separate line for any change order. If the homeowner approved $480 of extra decking repair, show it by name instead of burying it in the final number.
How the free roofing invoice template works
The workbook has four kinds of tabs, and you only need to touch two of them for a job.
- Start Here explains the steps and lists what to check before you use it.
- Project Setup is where you enter your company, the customer, the job address, the contract total and your billing schedule. You list each payment, the percent of the contract it covers, and what triggers it. The sheet checks that your percents add up to 100%.
- Invoice is the page you send. Pick the payment you’re billing from a drop-down and it fills in the amount, what was paid before, and the balance after. You can leave the line items empty to bill a flat milestone, or add line items if you want to itemize.
- The three example tabs show a complete deposit, progress and final invoice for the sample job.
When you mark a payment as Paid on the setup tab, the next invoice picks it up automatically. That’s the running balance. You never retype the earlier payments.
Save one copy of the workbook per job. Print or export the Invoice tab to PDF, or paste it into your own email. If you want a nicer-looking PDF, you can paste the numbers into Claude, ChatGPT or Gemini and ask it to turn them into a branded invoice PDF. Check every number it gives back before you send it. If you’d rather work in Word or Google Sheets, the workbook opens in both. The layout will hold, but check that the drop-downs and formulas still work after you move it.
One $15,000 job, three invoices
Here’s the sample job from the workbook. The contract is $15,000 for a full roof replacement. The billing schedule is 30% on signing, 40% when materials are delivered and tear-off starts, and 30% when the work is complete and the walkthrough is done. These aren’t typical terms, and they aren’t advice about what you should charge. They’re numbers chosen so the math is easy to follow.
Invoice 1: the deposit
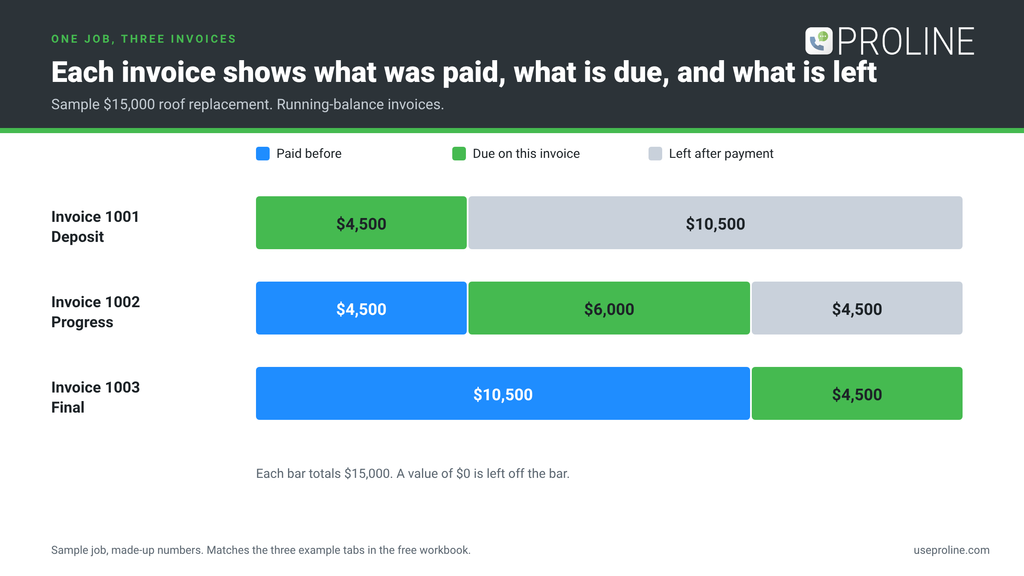
The customer signs on January 5, and you send invoice 1001 for $4,500. Nothing has been paid yet, so the invoice shows the contract total of $15,000, nothing paid before, $4,500 due now, and $10,500 left after this payment is made. Write what the deposit is for in plain words, like “Deposit to schedule the job and order materials.” Customers pay faster when they know what they’re paying for.
Invoice 2: the progress payment
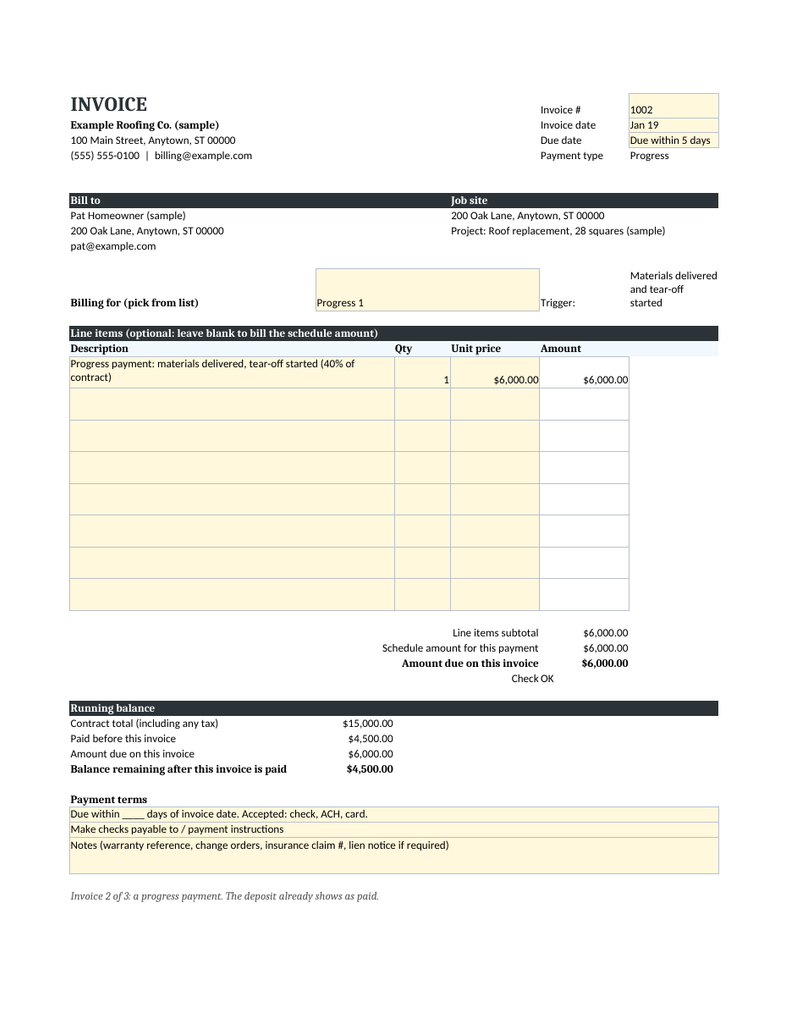
On January 19 the shingles arrive and the crew starts tear-off. That’s the trigger in the contract, so you send invoice 1002 for $6,000. It shows the same $15,000 contract total, the $4,500 deposit already paid, $6,000 due now, and $4,500 left after. The homeowner can see the whole story on one page.
Invoice 3: the final payment
On February 2 the work is done and you’ve walked the roof with the customer. Invoice 1003 is for $4,500. It shows $10,500 paid before this invoice, $4,500 due now, and $0 left. If a change order was approved during the job, add it as its own line and adjust the totals. The invoice should match what the customer agreed to in writing.
Running-balance invoices vs. standalone invoices
There are two ways to set up a multi-payment job. A running-balance invoice shows the full contract and carries the history forward, so each new invoice reads like a statement. A standalone invoice shows only the amount for that one payment, with no history.
For deposit, progress and final payments on one contract, the running balance is usually the clearer choice, and it’s how the workbook is set up. The customer always sees the total price, what they’ve paid, and what remains. Standalone invoices make more sense for charges that sit outside the main contract, like a separately priced repair, a service call, or an extra the homeowner asked for on the side. Mixing the two on one job is fine as long as you label each one clearly.
The tradeoff is simple. Running-balance invoices take a few more seconds to read, and they depend on your records being right. If you forget to mark a payment as received, the next balance will be wrong. Standalone invoices are easier to produce, but customers have to keep their own running total. Pick whichever your customers and your bookkeeper can follow without a phone call.
Why the deposit doesn’t cover the first bills
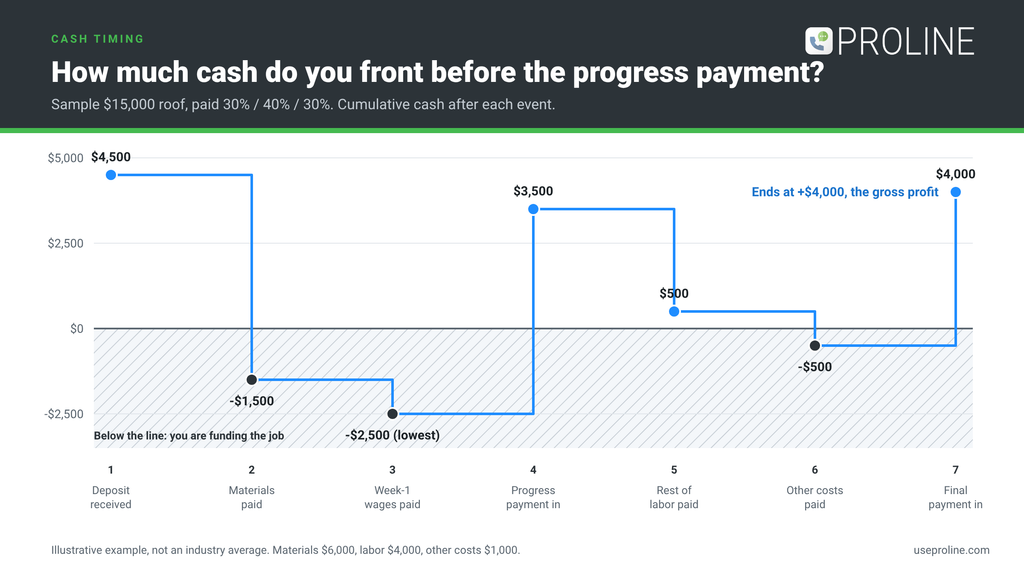
The deposit and the first big bills rarely land on the same day. In the sample job, the numbers look like this. The contract is $15,000. Materials cost $6,000, direct labor is $4,000, and other direct job costs like dump fees come to $1,000. That leaves $4,000 of gross profit when everything is done.
Now look at the timing. The $4,500 deposit comes in at signing. Then you pay $6,000 for materials when they’re delivered, and about $1,000 in crew wages for the first week. That’s $7,000 out before the next customer payment. Even after the deposit, you’re $2,500 short until the progress payment arrives. The job is profitable on paper. It’s still cash-negative for a stretch. Without a deposit, the same job would be $7,000 short at that point.
This is why deposits and milestones need to be planned, not guessed. Gross profit and cash on hand are different things. A job can show $4,000 of profit at the end and still force you to fund $2,500 in the middle. If you’re doing several jobs at once, those gaps stack up. Set your payment schedule so the early payments cover the early costs, and your progress payment lands about when your next big bills do.

Roofing cash-gap calculator
Enter your job numbers to see how much cash you front before your payments catch up. Set the deposit to 0 if you don’t take one.
| Step | Cash in | Cash out | Cash on hand |
|---|
Illustration only. It assumes this order: deposit, materials, first-week labor, progress payment, rest of labor, other costs, final payment. Your timing will be different, and your costs and terms are yours. Nothing here is financial or legal advice. Built by ProLine (useproline.com).
Plug in your own numbers below to see where your cash dips. Change the deposit to 0 to see what skipping it does, then change the progress percent and watch the lowest point move.
These numbers are an illustration, not an industry benchmark. Your own material costs, labor and payment terms will be different. Plug in yours and see where your cash dips. The invoice workbook’s setup tab will show you what each payment is, and you can compare it against your own cost timing. For more on managing the gap between spending and collecting, see our guide to handling contractor payments in roofing, and our article on making deposits work for roofers.
Payment terms and wording that prevent arguments
Most invoice disputes start with unclear terms. Say exactly when payment is due, in a form nobody can misread. “Due on receipt,” “due within 5 days,” or “due on [date]” all work. “Due soon” doesn’t.
List the payment methods you accept, like check, ACH and card. If you charge a fee for card payments, or offer a discount for paying by check or ACH, say so on the invoice and in the contract. Rules about card fees and discounts vary by state and by card network, so check what’s allowed where you work before you add one. If you’re not sure, ask your attorney or your payment provider.
Add a short note about what happens if payment is late, if your contract allows it. Keep it plain and match what the contract says. Don’t invent new penalties on an invoice that the customer never agreed to.
On insurance jobs, the money can come from more than one place. The homeowner pays the deductible and anything the policy doesn’t cover, and the insurer pays the rest. The Consumer Financial Protection Bureau says insurers generally make the claim check out to both the homeowner and the mortgage lender, and the lender may release the money in stages as the work moves along. How much the insurer pays also depends on the policy. As the National Association of Insurance Commissioners explains, a replacement cost policy pays to replace the roof minus the deductible, while an actual cash value policy subtracts depreciation and pays less. Write each amount and who owes it on the invoice, and ask the homeowner what their policy and lender require. Read the CFPB explanation and the NAIC article on replacement cost and actual cash value for the details.
Finally, if your state requires lien notices, waivers or specific contract wording, follow those rules. The template has a notes field for it, but it doesn’t replace legal advice.
Invoice vs. receipt: when to send each
An invoice asks for money. A receipt confirms you got it. They’re two different documents, and you can use both on one job. Send an invoice before payment, with an amount due and a due date. Send a receipt after payment, showing the amount received, the date, and the method.
For most roofing jobs, you don’t need a separate receipt for every payment if your final invoice shows a clear history, with each payment, date and amount. But some customers, accountants or insurance companies want a receipt. When they ask, make one the same day. It takes a minute and avoids a follow-up call. If your invoice software marks invoices as paid and emails a confirmation, that may serve the same purpose. Check that it shows the details your customers need.
Seven invoicing mistakes that cost roofers money
- Sending the invoice days after the milestone. The longer you wait, the slower you get paid, and the harder it is to remember what was done.
- Skipping the history. A bare “$6,000 due” invites questions. Show the contract, the payments received and the balance.
- Billing for work that isn’t done yet. If the contract says the payment is due when tear-off starts, don’t send it the day before.
- Leaving out change orders, or adding them without written approval. Get the approval first, then show it as its own line.
- Vague descriptions. “Roofing work” tells the customer nothing. “Progress payment: materials delivered, tear-off started” does.
- No due date or no payment instructions. Give people a date and a simple way to pay.
- Keeping invoices in three places. When some live in a spreadsheet, some in email and some in a notebook, nobody knows the balance.
When a spreadsheet stops being enough
A spreadsheet works well for a handful of jobs. It starts to strain when you have several jobs open, more than one person sending invoices, or customers who want to pay by card or bank transfer from their phones. At that point, the time goes into copying numbers, checking balances, and chasing payments.
ProLine’s invoicing is built around the same running-balance idea. You can create an invoice from a project and pick the fully signed quotes you want to bill, and ProLine builds the line items from them using an invoice template you set up in advance. The Invoice Builder lets you edit line items, and homeowners can get invoices by text and pay by card or ACH. Texts you send by hand are covered in your plan, and automated texts can use credits. If your quote template is set to send a deposit invoice on signing, ProLine sends it along with the signed copy. And if you use QuickBooks, you can connect it and choose which QuickBooks service each invoice group maps to. You can watch it in action in this demo, Roofing Invoicing with ProLine CRM, and find more walkthroughs on the ProLine YouTube channel.
The bigger payoff is that the pieces connect. Price list items can go on quotes and invoices, so the price you quoted is the price you bill. A fully signed quote can feed the invoice, and if your quote template is set to do it, ProLine can create draft material orders for your office to review when the quote is fully signed. A spreadsheet can’t do that, and that’s the main reason to move off one.
It isn’t the right fit for everyone. If you do a few jobs a month and you’re comfortable in a spreadsheet, keep using one. The test is whether you’re spending hours rebuilding balances by hand or losing track of who owes what. If you are, see how ProLine’s invoicing works and compare it to your current process.
FAQs
What should a roofing invoice include?
Your company name and contact info, the customer’s name and job address, an invoice number, date and due date, a clear description of what the payment covers, the contract total, payments already received, the amount due now, and the balance after this payment. Add payment instructions and any license number your state requires.
Should I use a deposit, progress and final invoice on a roofing job?
For most jobs with more than one payment, yes. Each invoice matches a step in your contract, so the customer always knows why they’re being billed. The exact schedule is up to your contract and your state’s rules, so check those before you choose percentages.
What’s the difference between a running-balance invoice and a standalone invoice?
A running-balance invoice shows the full contract price, what’s been paid, and what’s left, so each invoice carries the history forward. A standalone invoice shows only that one charge. Running-balance invoices are usually clearer for deposit, progress and final payments on one contract.
Is an invoice the same as a receipt?
No. An invoice asks for payment and shows what’s due. A receipt confirms that you received payment and shows the amount, date and method. You can send both on the same job.
How much deposit should a roofer ask for?
It depends on your costs, your contract and your state’s rules. Some states have rules about deposit amounts on home improvement work, so check the rules where you work. A useful test is to compare the deposit against the first bills you’ll have to pay, like materials and permits, and see how much you’d have to fund yourself.
Can I use this invoice template for insurance jobs?
You can use it as a starting point. Insurance jobs often involve more than one payer, and the insurer’s check may be made out to both the homeowner and their mortgage lender. Write each amount and who owes it, and ask the homeowner what their policy and lender require.