Metal roofing isn’t rocket science! Read on to discover how the pros get accurate measurements for metal roofs every time.
Metal roofs are a hot topic for roofers. And no, that’s not just because you could cook bacon on a metal roof in Georgia in the summer. Some roofers swear by them. Others, like Scott Tebay of the Small Town Roofer Podcast, hate them. Scott allegedly wrote a document outlining exactly why he hates them.
But plenty of roofers sell metal roofs at a profit and customers love them. And if you’re looking to get in on that action for your roofing business, this article is for you. It covers how to measure for a metal roof.
Credit where it’s due. The best video guide available on this topic is from Grand Roofing Inc. Seriously, there are comments asking him for a full install video. A lot of the content in this guide was inspired by that guide. Read this article and watch that video to fill in the gaps and see it in action!
Let’s get into it!

Preparation Before Measurement
Understanding Roof Layers
Before you dive into measuring, you must know what you’re dealing with up there. One layer of roofing or more? This changes everything. A single layer, easy peasy. Two layers, you’ve got some thinking to do. Tearing off old material means more time and cash. But if you leave it, especially with asphalt under metal, you risk heat buildup and quicker wear and tear. Don’t just guess. Lift a corner of that shingle. If you see plywood or OSB, you’re in the clear for a single layer. If not, get ready to strip off the old before laying down the new.
Tools and Safety Equipment
Now, let’s talk tools. Every roofer worth their salt has a trusty measuring tape, a notepad for notes, and a sturdy ladder. But don’t stop there. Grab yourself a chalk line, a hammer, and a pencil. And don’t even think about climbing up without safety gear. You need a harness, good shoes with grip, and gloves. A hard hat wouldn’t hurt either. Your body is your most important tool. Take care of it.
Or Just Order Measurements from EagleView
Got a few extra bucks in the budget? EagleView will do the measuring for you. They use aerial imaging to get precise measurements without you ever leaving the ground. It’s accurate and saves time.If your budget allows, it can be a real game-changer.
Measuring a roof might seem straightforward, but it’s a mix of art and science. Take your time, use the right tools, and stay safe.
By the way, EagleView integrates directly with ProLine CRM. Book a demo to learn more.
Measuring a Metal Roof
To measure a roof for metal, measure each roof plane’s eave-to-ridge length, total roof width, and all edges (ridge, eave, rake, hip, valley). Record pitch for each plane, then use the manufacturer’s panel coverage width to count panels and add trim lengths for caps and edging. Here’s a much more detailed break down!
Determining Roof Type
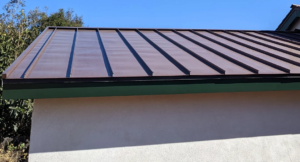
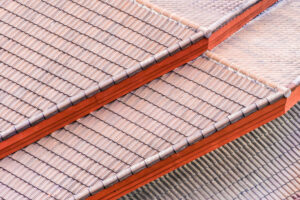
First things first. Know what kind of metal roof you’ll be installing. There are two main types: exposed fastener roofs and standing seam roofs. Each one has its quirks and needs different handling.
Exposed fastener roofs show the screws and washers right on top. These are common and quicker to install. You can spot them by the visible screws holding down the panels. They’re straightforward and cost-effective.
Standing seam roofs hide the fasteners under raised seams. They offer a sleek, clean look. No screws in sight. These roofs take a bit more time and skill to install but give a modern and smooth finish.
Measuring the Roof Dimensions
Grab your measuring tape and let’s get to work. First things first, start with the width. Hook your tape at one end and stretch it to the other. Jot down that number. Next, move on to the length. Measure from the ridge to the edge, keeping it straight. Write it down too.
But we’re not done. Don’t forget the overhang. That’s the bit hanging over the edge. Measure it from the edge to the end. Usually, it’s about 3/4 inch to 1 inch. That said, measure the overhang you plan to build, not a rule-of-thumb number. The target changes by edge trim, gutter, and panel profile.
Now, let’s dive deeper. Measure every edge, including the apron. Hook your tape at the bottom edge and stretch it to the corner. Write down the length. For the valleys, measure from the bottom to the top. Add a few extra inches for proper overlap.
Move on to the gables. Hook your tape at the base and stretch it to the peak. Note the length. For the panels, measure the width of the roof. Divide the roof width by the panel coverage width. Coverage width equals panel width minus overlap. Use the manufacturer’s spec sheet. This gives you the number of panels needed.
Next, measure the ridge cap. Start at one gable end and measure to the other. Make sure the ridge cap will cover the entire length. For the boots, measure around chimneys and vents. Get the width and height of each. Add extra material to wrap around snugly.
Don’t forget the backside. Measure from the ridge to the edge, just like the front. Ensure all dimensions match up for a seamless installation.
Take your time with these steps. Good measurements save headaches down the line. Remember, a few extra minutes here can save hours later. Write every measurement down, then verify each plane before you order material. Measure twice, cut once. It’s a mantra for a reason. Every detail counts, so cover all your bases.
Calculating the Number of Metal Panels
Now, let’s do some math. Most metal panels are 36 inches wide. To find out how many you need, divide the roof width by 36. For example, if your roof width is 720 inches, you need 20 panels. Easy as pie.
Each panel must fit snugly. Avoid gaps that could lead to leaks. Check your numbers twice. Measure, measure, measure again. You’ll thank yourself later.
Special Considerations
Accounting for Roof Features
Every roof has unique features like chimneys, vents, and skylights. These require extra attention. For chimneys, measure the width and height. Add extra material to wrap around. Vents need a similar approach. Measure their circumference and add a bit more for a snug fit. Skylights can be tricky. Measure all four sides, then add extra material for flashing.
When you run into unusual features, don’t panic. Stick to the basics. Measure carefully. Add extra material. Plan for a tight fit. Every extra minute you spend here will save you time and frustration later.
Practical Tips and Common Mistakes
Tips for Accurate Measurements
Measure twice, cut once. Double-checking your measurements saves a ton of trouble. Go over each measurement again. Compare them to your notes. This simple step catches mistakes before they become problems.
Consistency is key. Use the same measurement techniques throughout the project. Hook your tape the same way every time. Stretch it straight and keep it taut. Consistent methods mean reliable results. Trust your tools, but trust your process more.
Measure everything twice. Double-check all your numbers. Even if you’re sure, take a second look. This extra step ensures accuracy and prevents costly errors.
Common Mistakes to Avoid
Avoid over-measuring and under-measuring. Both cause issues. Over-measuring means wasted material and money. Under-measuring leads to shortages and delays. Measure carefully and accurately to get it right the first time.
Don’t ignore the roof slope. Failing to account for slope leads to miscalculations. Measure pitch as rise over run (example: 4/12). Use a pitch gauge, framing square method, or an app. Record pitch for each plane. Incorporate this into your measurements. This step ensures your panels fit properly and cover the roof correctly.
Be mindful of roof features. Chimneys, vents, and skylights need precise measuring. Incorrect measurements here cause big problems. Measure each feature individually. Add extra material to ensure a tight fit.
Avoid rushing. Haste makes waste. Take your time with each step. Rushing leads to mistakes and overlooked details. Slow down and measure carefully. The extra time spent now saves time and headaches later.
Following these tips and avoiding common mistakes helps ensure a successful roofing project. Measure accurately, double-check everything, and take your time. Your roof will thank you.
Materials Takeoff: Turning Measurements Into Orders
You’ve got your measurements. Great. Now what?
This is the part where most guides stop, and most roofers start guessing. You know how many square feet you’re covering. You know your ridge length. But the supplier wants to know how many panels, what trim lengths, and how much underlayment.
Here’s how to turn those measurements into a clean material order.
Panels (The Big Ticket Item)
Here’s what trips people up: panel width is not the same as coverage width.
A 36-inch panel doesn’t cover 36 inches of roof. After overlap, you’re looking at 34 inches of actual coverage (sometimes less, depending on the profile). Always check the manufacturer’s spec sheet for coverage width.
The formula is simple:
- Panels per roof plane = roof width ÷ coverage width
- Panel length = eave-to-ridge measurement + your planned overhang (usually 3/4″ to 1″)
Round up. Always. You can’t install 19.4 panels. You need 20.
Standing seam vs exposed fastener:
- Standing seam panels usually have narrower coverage (16″ actual coverage from a 20″ panel is common)
- Exposed fastener panels typically cover more per sheet
- Check your system specs before you order
Trim (What Costs More Than You Think)
Trim adds up fast. Every edge needs something, and it all ties back to the measurements you already took.
Here’s what you need and where it comes from:
- Ridge cap = total ridge length
- Eave trim/drip edge = total eave length
- Rake/gable trim = total rake length
- Valley metal = total valley length
- Hip cap = total hip length (if applicable)
- Sidewall/headwall flashing = wall intersection lengths
- Pipe boots = count every penetration, note the diameter
Add 10% for waste and overlaps. Trim is where the “oh crap, I’m short” moment happens most often.
Confirm your profile matches your panel system. Not all trim fits all panels.
Underlayment and Ice & Water Shield
This one’s straightforward but critical.
Underlayment quantity ties directly to your roof area in squares, plus overlap and waste. Most underlayment rolls cover 10 squares, but check your product. Add 10-15% for overlap and waste.
Ice & water shield depends on your climate and local code:
- Most codes require it along eaves (at least 24″ past the interior wall line)
- Valleys usually need it too
- Some jurisdictions require full coverage
Don’t guess on this. Follow local code and the manufacturer’s requirements. An inspector will make you tear it off if you don’t.
Fasteners, Clips, and Sealants
Here’s where you can’t give one magic number, because every system is different.
For exposed fastener systems:
- Fastener count depends on panel type, spacing requirements, wind zone, and manufacturer pattern
- Plan for screws along every rib, plus perimeter fastening
- Use the manufacturer’s install guide for the fastener schedule
For standing seam systems:
- Clip spacing depends on the panel profile, uplift rating, and manufacturer specs
- Wind zone matters—high-wind areas need tighter clip spacing
- Again, manufacturer’s guide is your bible here
The practical takeaway: Don’t guess on fasteners. Use the manufacturer’s schedule. Period.
Same goes for sealant and butyl tape. Count your seams, penetrations, and detail areas. Then add 20% because you’ll always use more than you think.
The Quick Reference Table
This table connects each material to the measurement that controls it:
| Material | What to Measure | How to Calculate | Notes |
|---|---|---|---|
| Panels | Roof width per plane | Width ÷ coverage width | Use coverage width, not panel width |
| Panel length | Eave-to-ridge | Measurement + overhang | Confirm max panel length for seams |
| Ridge cap | Ridge length | Total ridge length | Confirm cap type and overlap |
| Eave trim/drip | Eave length | Total eave length | Match your gutter plan |
| Rake/gable trim | Rake length | Total rake length | Profile must match panel |
| Valley metal | Valley length | Total valley length | Confirm valley style with supplier |
| Hip cap | Hip length | Total hip length | If applicable |
| Underlayment | Roof area | Area + 10-15% waste | Follow code for layers |
| Ice & water | Eaves/valleys | Per code requirements | Check local jurisdiction |
| Fasteners/clips | System + pattern | Per manufacturer | Depends on wind zone and uplift |
| Sealant/tape | Seams + penetrations | Per details list | Add 20% buffer |
Good measurements get you in the ballpark. A solid takeoff gets the material ordered right the first time.
No second trips to the supplier. No job delays because you’re short three panels. No wasted cash on material you didn’t need.
Measure once. Calculate twice. Order right.
FAQ: How to Measure for a Metal Roof Like a Pro
Do I measure a metal roof in squares or in feet?
Measure in feet first. You need linear feet for trim and panel length. You also need square footage for underlayment and budgeting. Keep both numbers in your notes.
What measurements do I need before I order metal panels?
You need eave-to-ridge length for each roof plane, roof width for each plane, and every edge length that needs trim (ridge, eave, rake, hip, valley). You also need roof pitch for each plane.
Do I use panel width or coverage width to count panels?
Use coverage width. Coverage width is what the panel covers after overlap. Panel width is what it measures before overlap. If you use panel width, you can under-order.
How do I measure roof pitch for a metal roof?
Measure pitch as rise over run, like 4/12 or 6/12. Use a pitch gauge, framing-square method, or a pitch app. Record pitch for each plane because old roofs can change plane to plane.
Do I measure along the roof surface or straight across the ground?
Measure the roof surface when you need panel length and underlayment area. Measure straight across when you’re mapping the footprint. If you only measure the footprint, you’ll miss real panel length on steeper roofs.
How do I calculate how many panels I need?
For each roof plane, divide the roof width by the panel coverage width. Round up. Then multiply by the number of planes that match that width. Don’t mix planes unless they truly match.
Conclusion
Accurate roof measurements are crucial. We’ve covered a lot. Knowing your roof type sets the stage. Measuring dimensions thoroughly and precisely makes the difference. Attention to valleys, ridges, gables, and all roof features ensures a seamless installation.
Take your time with each step. Double-check your measurements. Consistent methods and tools lead to reliable results. Avoid common mistakes like over-measuring or under-measuring. Properly account for the roof slope and unique features. These steps save you from costly errors and ensure a successful project.
Accurate measurements make your roofing job smoother and more efficient. They prevent headaches and save time. They ensure your roof fits like a glove.
If you need more guidance, consult a professional. The Grand Roofing Inc. video offers excellent advice and expertise. Watching his video alongside reading this guide should give you a good idea of how to measure out a metal roof. And he’s got plenty more great content about installing and prepping metal roofs.
Plus, we’ve got some great tips for metal roofing on our YouTube channel. Check out these videos to learn more…
Metal Roofing Horror Stories: Avoid These Mistakes
Roofing advice for coastal homeowners
Watch and learn!
Remember, a well-measured roof is a well-installed roof. Happy roofing!
Need help sending quotes for those metal roofs you’ve been selling? ProLine CRM’s got you covered. Set up quote templates for every kind of roof you sell. Make measurements by hand or get an EagleView report. Then, send your quotes, fast and accurate.
Don’t believe it can be that easy? Book a demo to see it in action!